User guide for EG Go
This guide describes the functions in the appsEG Go and EG Log.
If this is your first time logging into EG Go, the guide below explains how to activate your user and how to log in. We recommend using Google Chrome when using EG Go.
➡️ Activate your user and log in for the first time
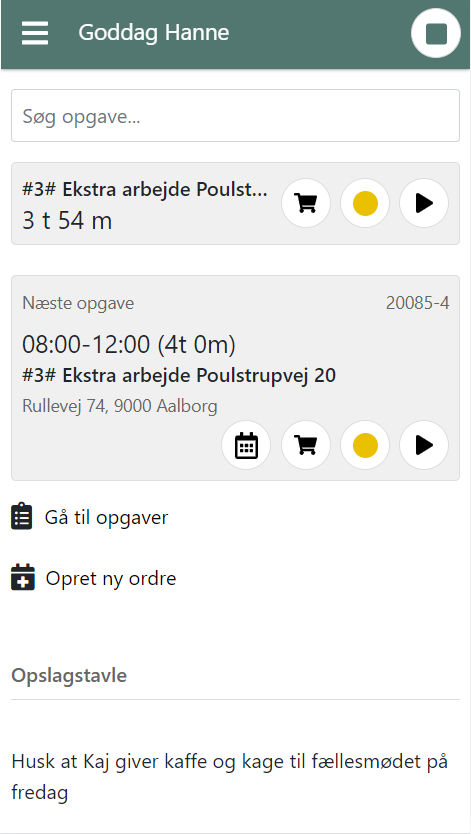
Home Screen
The home screen is the first thing you see when you open EG Go. What is displayed here may vary depending on:
- which functions you have access to
- how the system is set up in your company
- whether calendar scheduling is used
Below, the different parts of the home screen are explained.
Search Task:
At the top of the home screen, you will find the “Search Task” field. Here you can search for tasks you need to work on. You can search, for example, by:
- task name
- customer name
- the address where the task is performed
As you type, suggestions are displayed automatically. Click the task you want to work on to open it.
Active Time Tracking:
If your company uses time tracking and you have already started a time registration, the active task will be displayed at the top of the home screen. From here you can directly:
- start a new time registration
- add materials to the task
- change the task status
At the top right of the green header bar, you see a round dot. By clicking this, you can:
- pause or stop your current time registration
- record internal time, e.g., vacation or absence
The options you see here depend on how your administrator has set up the system.
Calendar Scheduling:
If your company uses calendar scheduling, the next task scheduled for you today will appear on the home screen. From this view, you can:
- modify the calendar appointment
- record time on the task
- add materials
- change the task status
Go to Tasks:
The “Go to Tasks” button gives you an overview of:
- your own planned tasks
- shared tasks your team can work on
Here you can easily find tasks you need to work on later.
Create New Order:
The “Create New Order” button is only visible if your administrator has granted you access. This feature is typically used if you need to create new tasks or orders directly from EG Go.
Notice Board:
The home screen may also display a notice board. General messages for all users of the app are shown here, such as important information from the office.
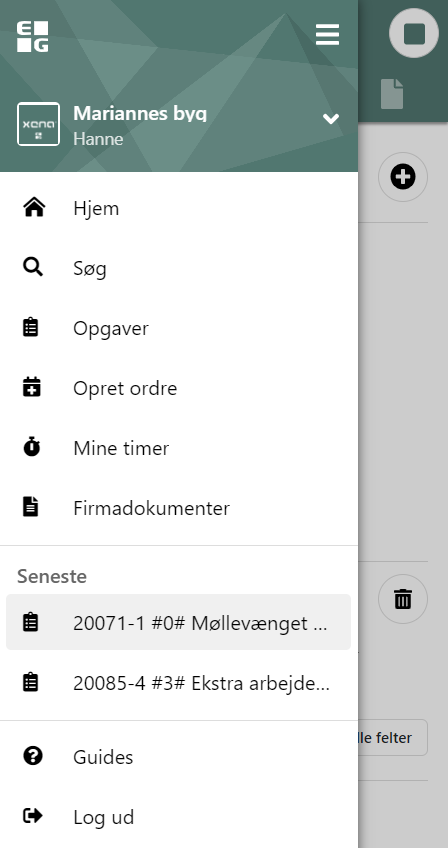
Menu
The menu opens by clicking the menu icon at the top left of the screen (the three-line icon). The menu gives you access to all functions in EG Go.
- Home: Go to the home screen
- Search: Search for tasks
- Tasks: View your planned and shared tasks in the calendar
- Create Order: Only visible if you have rights to create orders
- My Hours: View and edit your time registrations
- Company Documents: General documents always accessible
- Recent: Quick access to recent tasks you worked on
- Guides: Overview of guides for EG Go and EG Log
Searching for Tasks
Before you can record time or materials, you need to find the task you are working on. You can find tasks in several ways:
- via Recent in the menu
- via Search in the menu
- by searching directly from the home screen
When you select Search in the menu, a list of the 20 most recently created tasks will appear automatically. You can search by typing:
- task name
- address
- customer name
Results update as you type. Click the correct task to open it. If you mistakenly open the wrong task, click the back arrow at the top left to return to the search results.

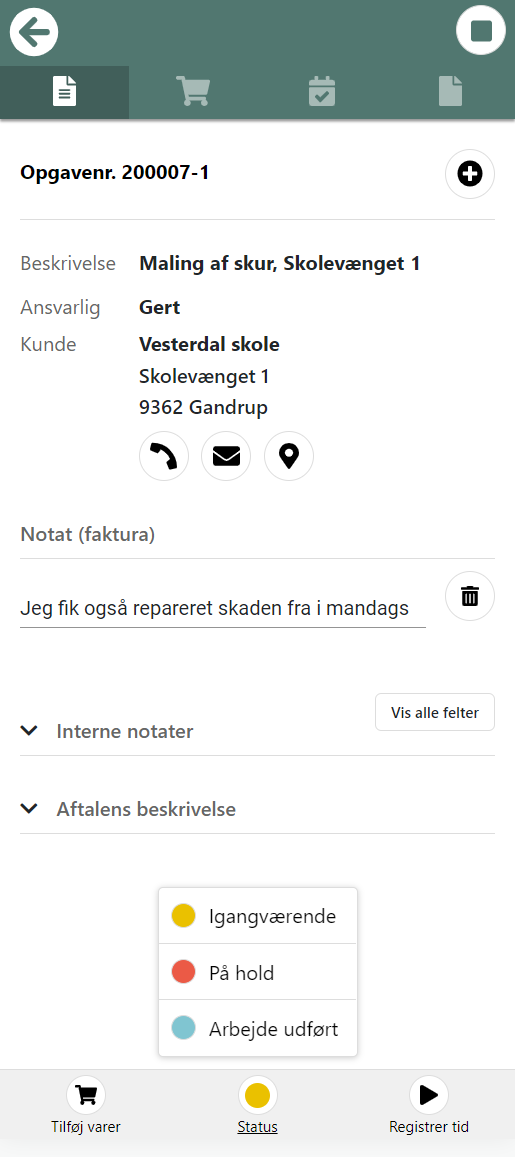
Task Details
When you select a task, its details open. Here you can find all the information you need while working on the task. You can see, for example:
- customer name and address
- which order the task belongs to
- task status
- notes from the office
Invoice Note
You can enter a note under “Invoice Note” for the task. This note is typically used for information to be included on the invoice for the customer, e.g., a brief description of the work performed.
If you want to remove a note, you can delete it by clicking the trash icon next to it.
Show All Fields
Click the “Show All Fields” button to display additional information, including:
- Internal notes
- Appointment description
Important messages from the office may be displayed here before you start the task.
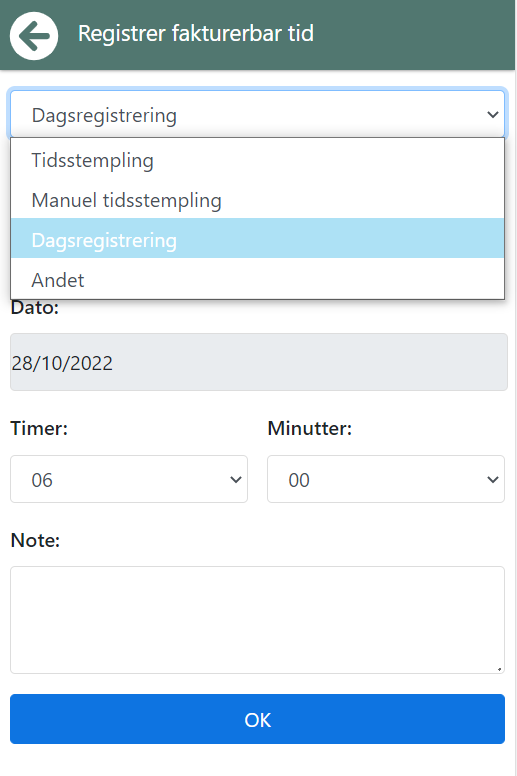
Register Time
To register the time you spend on a task, tap “Register time” at the bottom of the screen. The options you see next depend on how time registration is configured in your company. All types are explained below so you can see what they mean.
Time stamp
The time stamp works like a punch stamp. When you tap OK, time registration starts:
- on the selected activity code
- from the current time
The time now runs automatically until you pause or stop it.
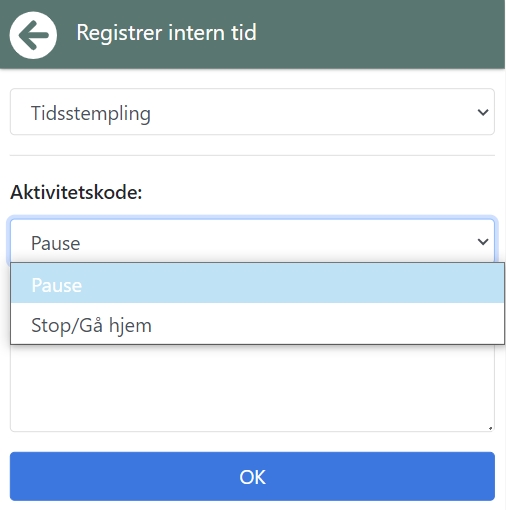
Pause and stop
When you take a break or when your workday ends, remember to stamp correctly. Tap the round white dot in the top-right corner of the green top bar. Here you can:
- stamp Pause
- stamp Stop / Go home
If you stamp Pause, remember to start a new time stamp when you resume work. At the end of the workday, always stamp Stop / Go home.
Manual Time Stamp
Manual time stamp works the same way as the regular time stamp. The difference is that you choose the start time yourself. This type is typically used if you forgot to stamp in at the correct time. As with regular time clocking, it is important that you:
- stamp breaks
- end the day with Stop / Go home
Daily Registration
With daily registration, you register your time as a total for the day. Here you select:
- activity code
- date
- number of hours and minutes
If your working hours are configured by the office, the number of hours is suggested automatically. You can always adjust the time if needed. You can also enter a note, which will be shown to the person approving your registrations.
Other
The “Other” type is used to register, for example:
- driving (km)
- meals
- accommodation
- other special registrations
The options available depend on the company setup.
Important Information About Time Zones
If you work abroad and your phone automatically changes time zones, the time on your time stamps will automatically be converted to Danish time. If you want the time to be registered exactly as shown on your phone, you must manually change your phone’s time zone to Danish time.
Device Location
The first time you use time clocking, you will be asked whether EG Go may use your device’s location. If you allow this, you will receive a warning if you stamp time more than 100 meters from the task address. You can always continue the registration if you are sure you selected the correct task.
Add Articles
If you have used materials on a task, you can register them directly on the task in EG Go. To add Articles, tap “Add Articles” at the bottom of the task.
When the screen opens, a list of the Articles you most recently used is shown automatically. If the Article is not on the list, you can search for it using the search field at the top. When you have found the correct Article:
- Enter or adjust the quantity
- Tap the shopping cart icon
The Article is now saved on the task.
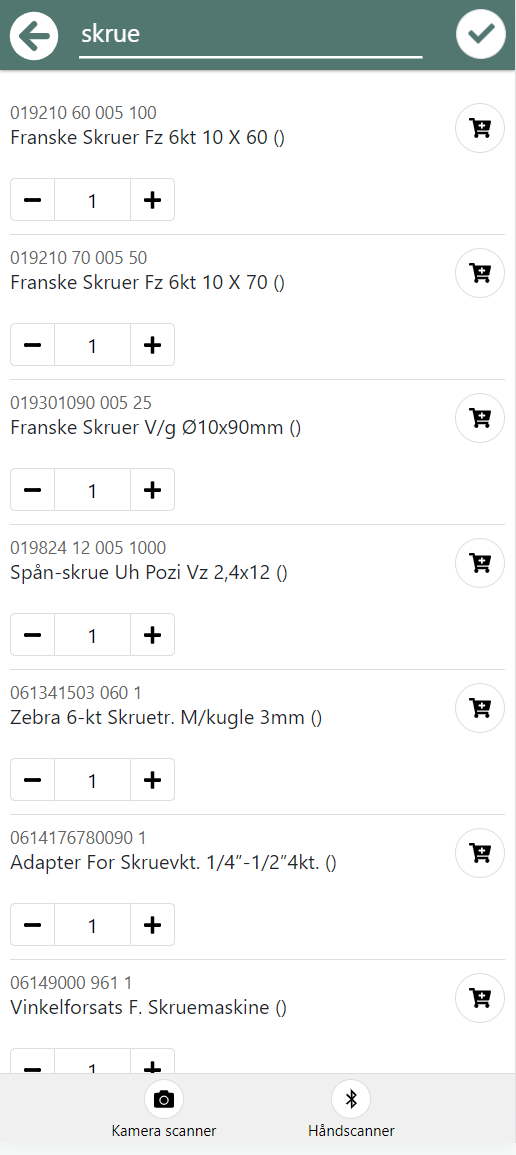
Scan Articles
You can also register Articles by scanning a:
- barcode
- QR code
Select “Camera scanner” to scan using your phone. If you have a handheld scanner connected to your phone, you can instead choose “Handheld scanner”. To use scanning, the Article must be created in the accounting system with a barcode Article number. If you are unsure, ask your administrator.
Change Task Status
When you have completed a task, or if the task is temporarily put on hold, you must change the task status. The status is changed by tapping the colored dot on the task. Which statuses are available and when they should be used is agreed internally within the company.
It is important that the status is updated correctly, as this ensures that:
- the office has an overview of tasks
- the project manager can see the status in the calendar
- planning can be adjusted as needed
Tabs at the Top of the Task
When viewing a task, you will see several tabs at the top of the screen. These tabs provide access to different information and functions. The tabs are:
- Overview
- Article consumption
- Quality assurance*
- Documents*
(*The last two tabs are only shown if your administrator has granted you access to the EG Log app.)
Overview
The Overview tab shows general information about the task. Here you can, among other things:
- view the customer’s address
- tap the address to display it on a map
- call the customer
- view the task status
- enter or edit an invoice note
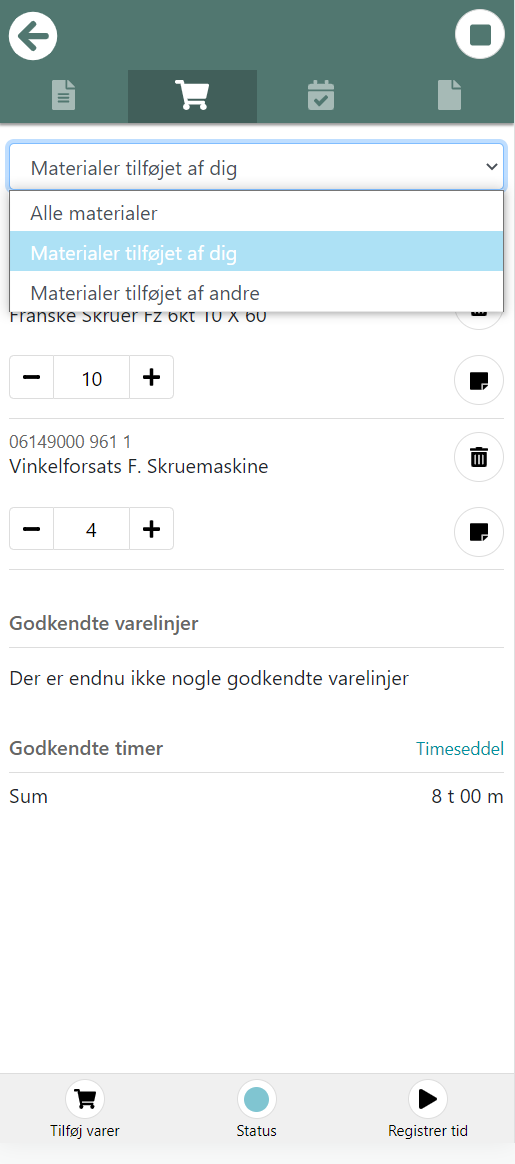
Article Consumption
Under the Article consumption tab, you can see all Articles registered on the task. At the top, you can select a filter, for example to only see Articles you have registered yourself. Next to your own Article lines, you can tap the document icon to enter additional text for the Article. This text becomes part of the invoice text sent to the customer.
If an Article has not yet been approved, you can:
- change the quantity
- delete the registration entirely
If the Article is approved, it cannot be deleted. Instead, you can reverse a quantity. When you reverse:
- a new line is created automatically
- the new line has a negative quantity
- the line awaits approval
At the bottom of the Article overview, you can see the number of approved hours on the task. Here you will also find a link to open your timesheet.
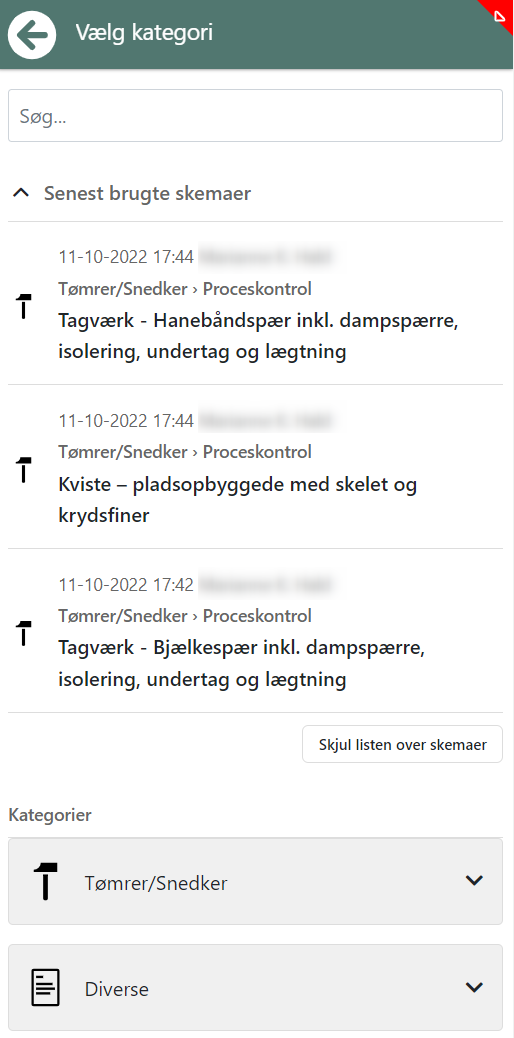
Quality assurance
The Quality assurance tab is used to work with quality assurance forms. Here you can:
- create new forms on the task
- continue working on ongoing forms
If a task requires a specific form, it is automatically shown as a suggestion with a red OBS icon. You can expand an overview and see the 10 most recently used forms. This allows you to quickly select the required form.
Fill in form
When you open a form, you can:
- add images
- write notes for each item
For each item, you must indicate whether:
- the item has been checked
- the item is not relevant for the task
At the bottom of the form, you can:
- add your signature
- GPS-stamp the form (used as documentation of time and location)

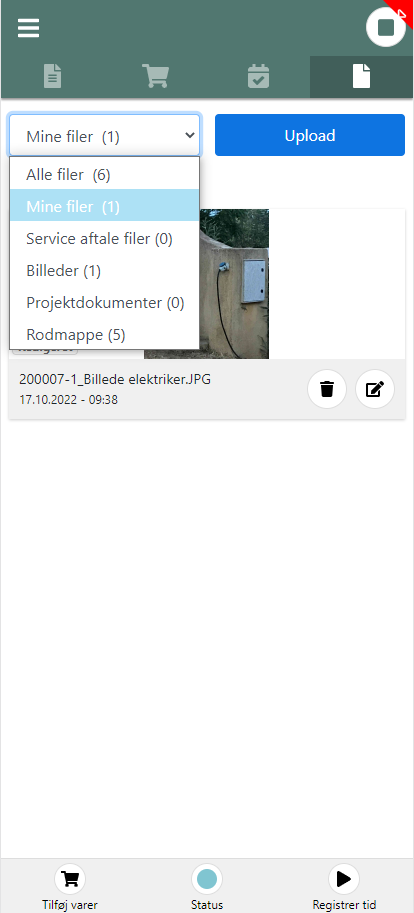
Documents
Under the Documents tab, you can save documentation on the task. At the top, you can choose between the folders you have access to. Here you can:
- take photos that are automatically saved on the task
- attach existing photos or documents from your device
⚠️ Note: only files (images/videos) smaller than 10 MB can be saved.
On iPhone and iPad, it is recommended to take photos horizontally, as iOS has limitations related to image rotation.
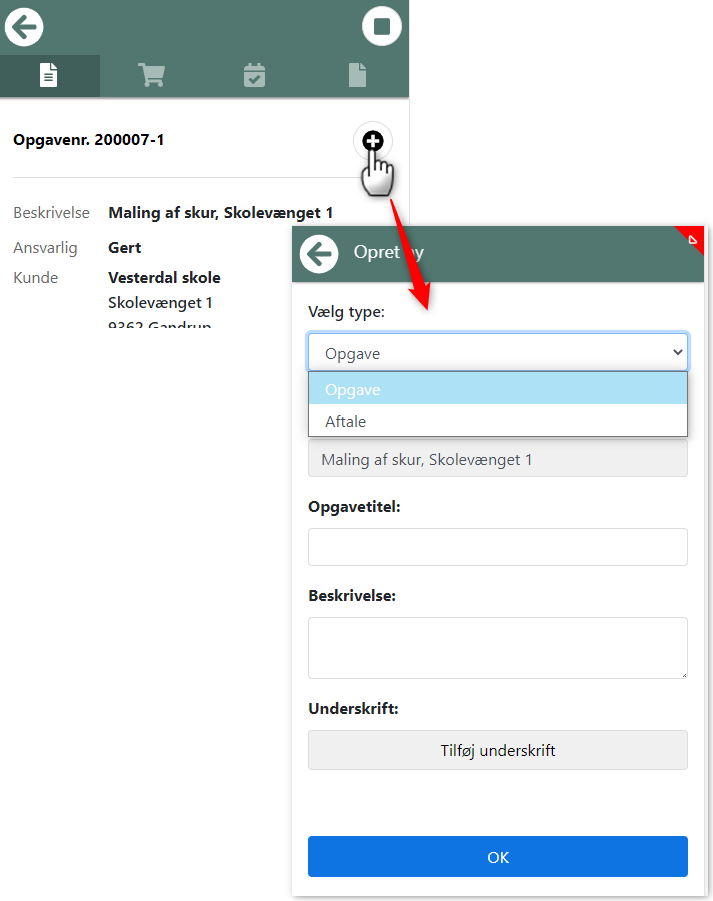
Create additional appointment/task
When viewing the overview of a task, you can choose to either:
- create an additional appointment in the calendar
- create a completely new task on the same order
This is done by tapping the “+” button on the task.
Create appointment (calendar)
If you choose to create an appointment, fill in the following:
- Enter an appointment title
- Enter a description (optional)
- Select date, start time, and duration
- Tap OK to save the appointment
The appointment is now shown in your calendar in EG Go.
Create new task
If you choose to create a new task, you must:
- Enter a task title
- Enter a description
- Tap “Add signature”, allowing the customer to sign directly on your phone or tablet
- Tap OK to save the task
When the task is created:
- a document is automatically created on the order
- the customer’s signature is saved as documentation
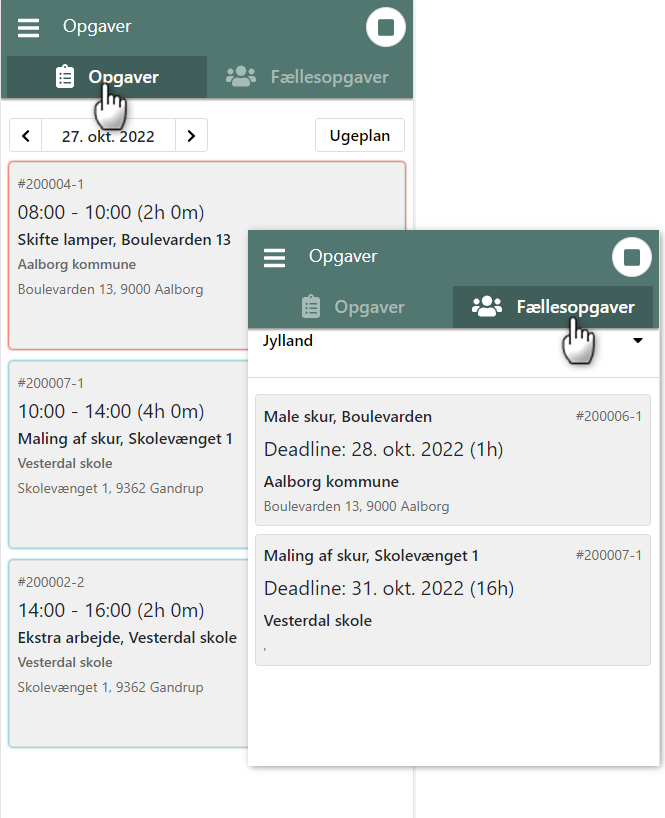
Tasks (calendar)
Under the menu item “Tasks”, you will find an overview of your tasks. Here you can:
- view your tasks for today or in weekly view
- navigate back and forth between dates and weeks
There are two types of tasks in the overview:
Tasks
These are tasks that are scheduled for you at a specific time. Tap the task to:
- register time
- register materials
- continue working on the task
Shared tasks
These are tasks that are not scheduled for a specific time. They are assigned to a team that you are a member of. Shared tasks are shown sorted by the deadline set on the task.
Take a shared task
You can take a shared task and place it in your own calendar. Once you take the task, other team members will no longer see it under shared tasks. When you take a shared task:
- you choose the date and time yourself
- the task is moved to your calendar
If you later change your mind, you can return the task to the team, after which it is automatically removed from your calendar.
Create order
The menu item “Create order” is only shown if your administrator has granted you access. This function is used when you need to create a new order yourself in EG Go. When creating an order, it is important to complete all relevant fields so the office has the necessary information later. You must, among other things, enter:
- a short task description
- an optional note
- a responsible person (this person must approve registrations)
- the customer related to the order
- an order status
It is important to agree with the office which status should be selected when creating an order. For example, if you create an order and start work immediately, it may be correct to select the status “In progress”.
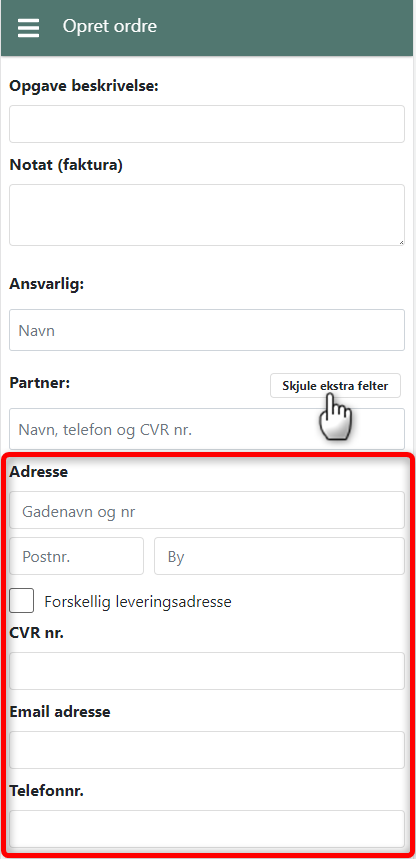
Create new customer
If the customer does not already exist in the system, you can create the customer yourself. This requires that your administrator has granted you permission to create new customers. Fill in the following information:
- Name
- Address
- Postal code
- City
- CVR number
- Email address
- Phone number
If the delivery address differs from the customer’s address, you can select this option and enter the delivery address separately.
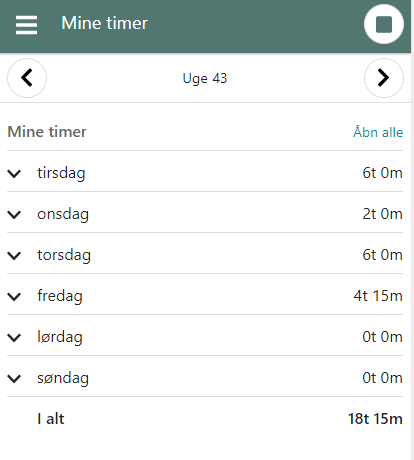
My hours
You can find your timesheet under the menu item “My hours”. Here you can:
- navigate back and forth between weeks
- see how many hours you have registered per week
- view an overview of other registrations by activity type
Detailed registrations
When you expand a date, you can see:
- individual registrations for the day
- start and end times
- which task the registration belongs to
Edit or delete registrations
If a registration has not yet been approved, you can:
- edit it by tapping the pencil icon
- delete it if it is incorrect
Once a registration has been approved, it can no longer be changed.
- Updated